Audience: Company
This guide walks you through setting up your expense policies to make sure they reflect your company's needs and make the reimbursement process simple for everyone involved.
Find your company's policies
Find your company's expense policies as follows:
Log into Reimbi: https://app.reimbi.com/
Click on Company settings in the left menu
Click on Expense policies in the dropdown menu
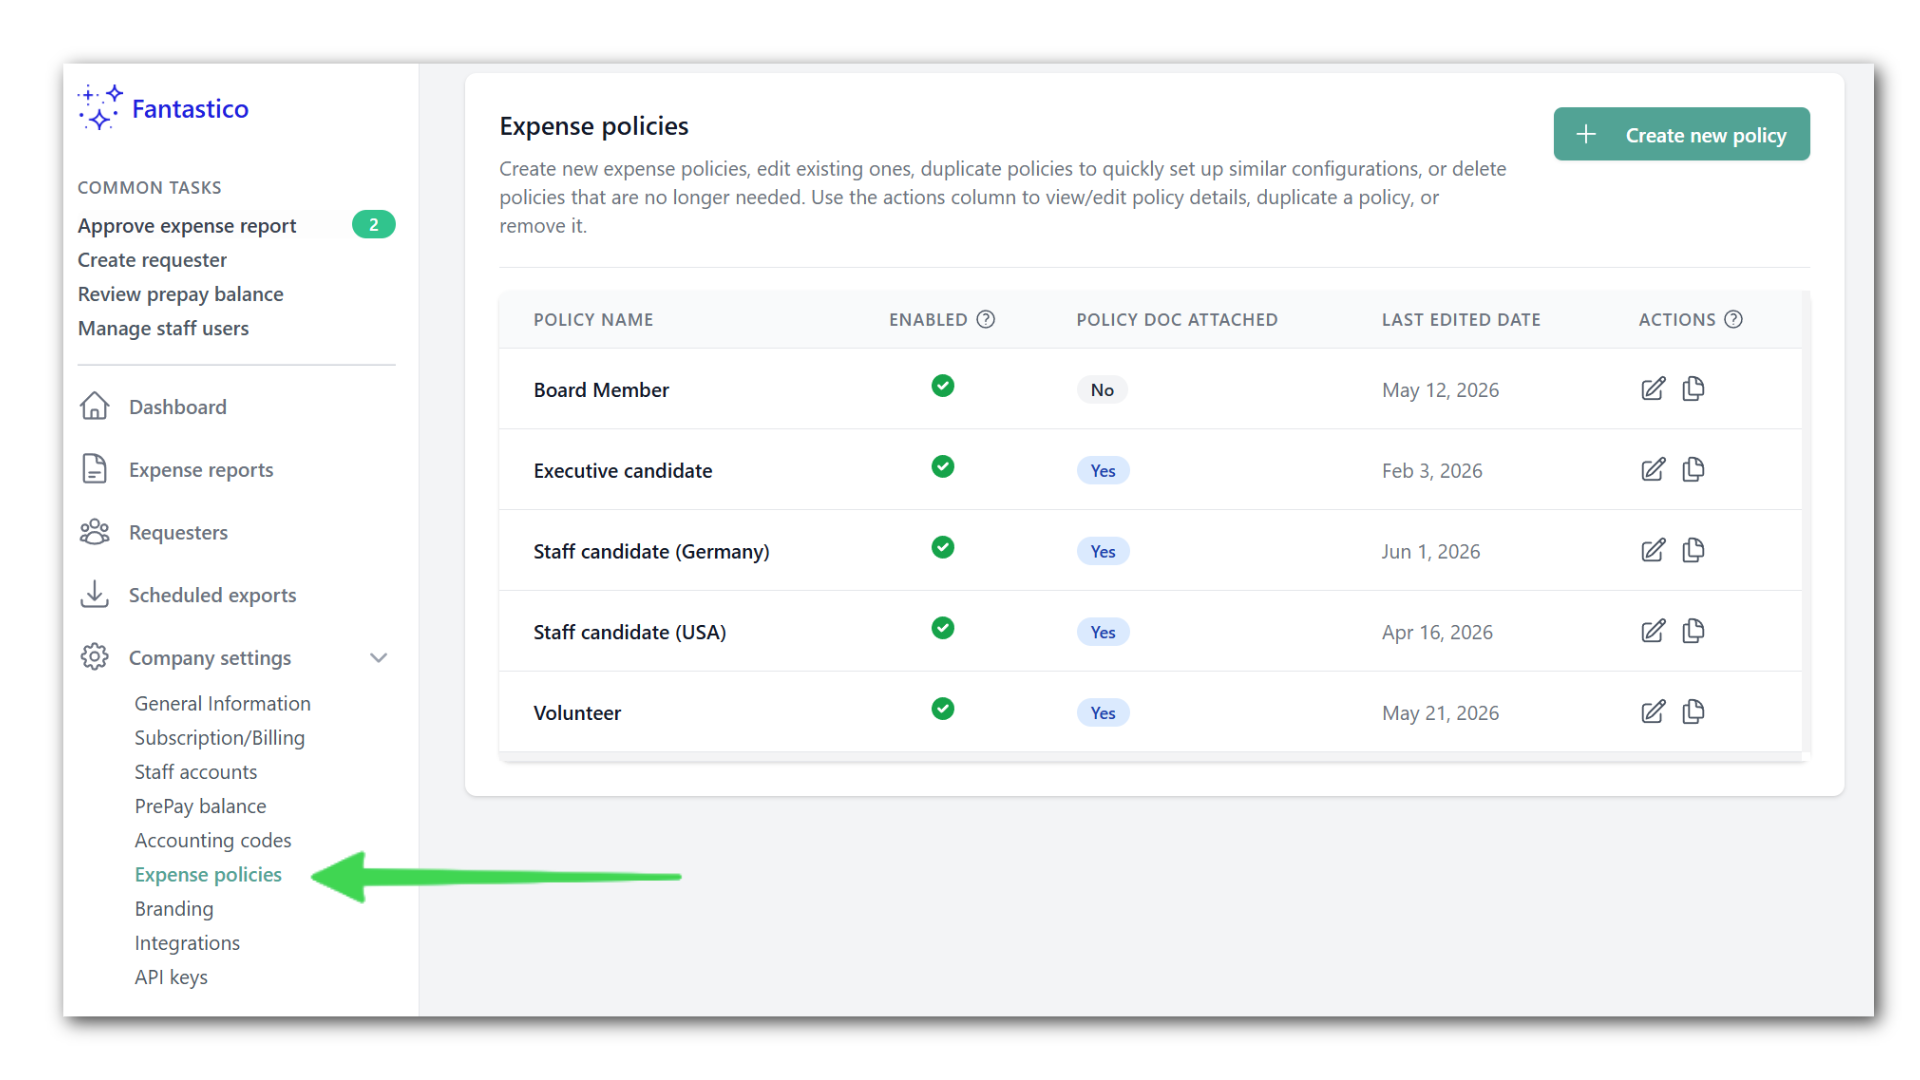
You'll see your existing policies displayed.
Please note: The policy names you see will be specific to your company.
Want to make a new one? Just hit the 'Create new policy' button in the top right corner.
Configure your Policy Settings
At the top of your Expense Policy screen you will see several tabs that allow you to configure aspects of your expense policy. These include General, Expense types, Mileage, Prompts, Requester limit, Invitation email, and Audit history.

General Settings
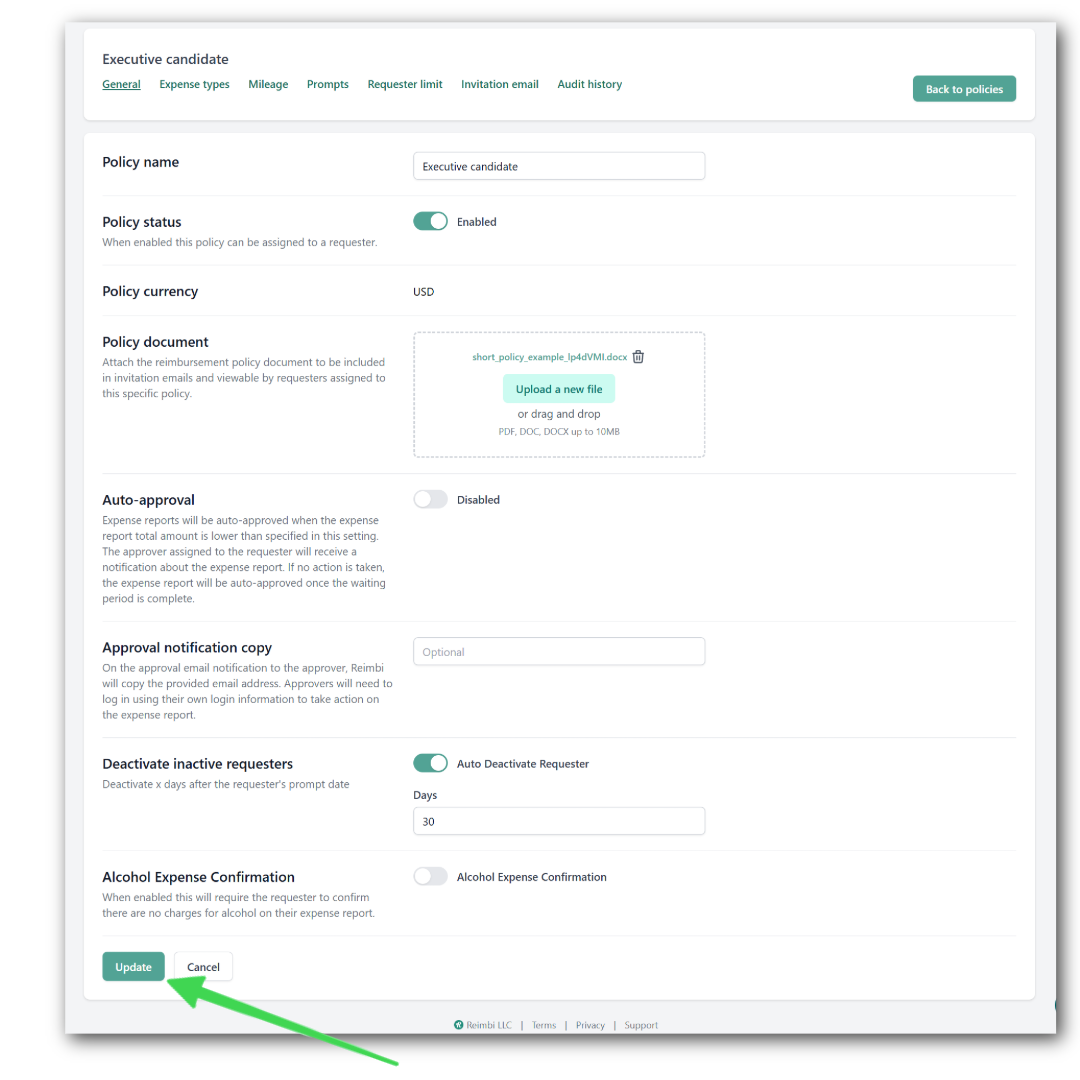
Policy Name: Give your policy a name.
Policy Status: Turn the policy on or off.
Policy Document: The best practice is to have a PDF or Word document explaining the policy details. Upload it here. We'll attach it to the invitation email when you add a new Requester.
Auto-approval: If you turn this on, expenses get approved automatically. The Approver receives notification of the approval.
Approval Notification Copy: If there are other people you want notified when expenses have been approved, add their emails here.
Deactivate Inactive Requesters: This feature automatically deactivates requesters who haven't used the system in a while.
Alcohol Expense Confirmation: When this option is enabled, Requesters will need to confirm that there are no alcohol expenses included in their expense report.
Remember to click Update when you're done.
Expense Type Settings
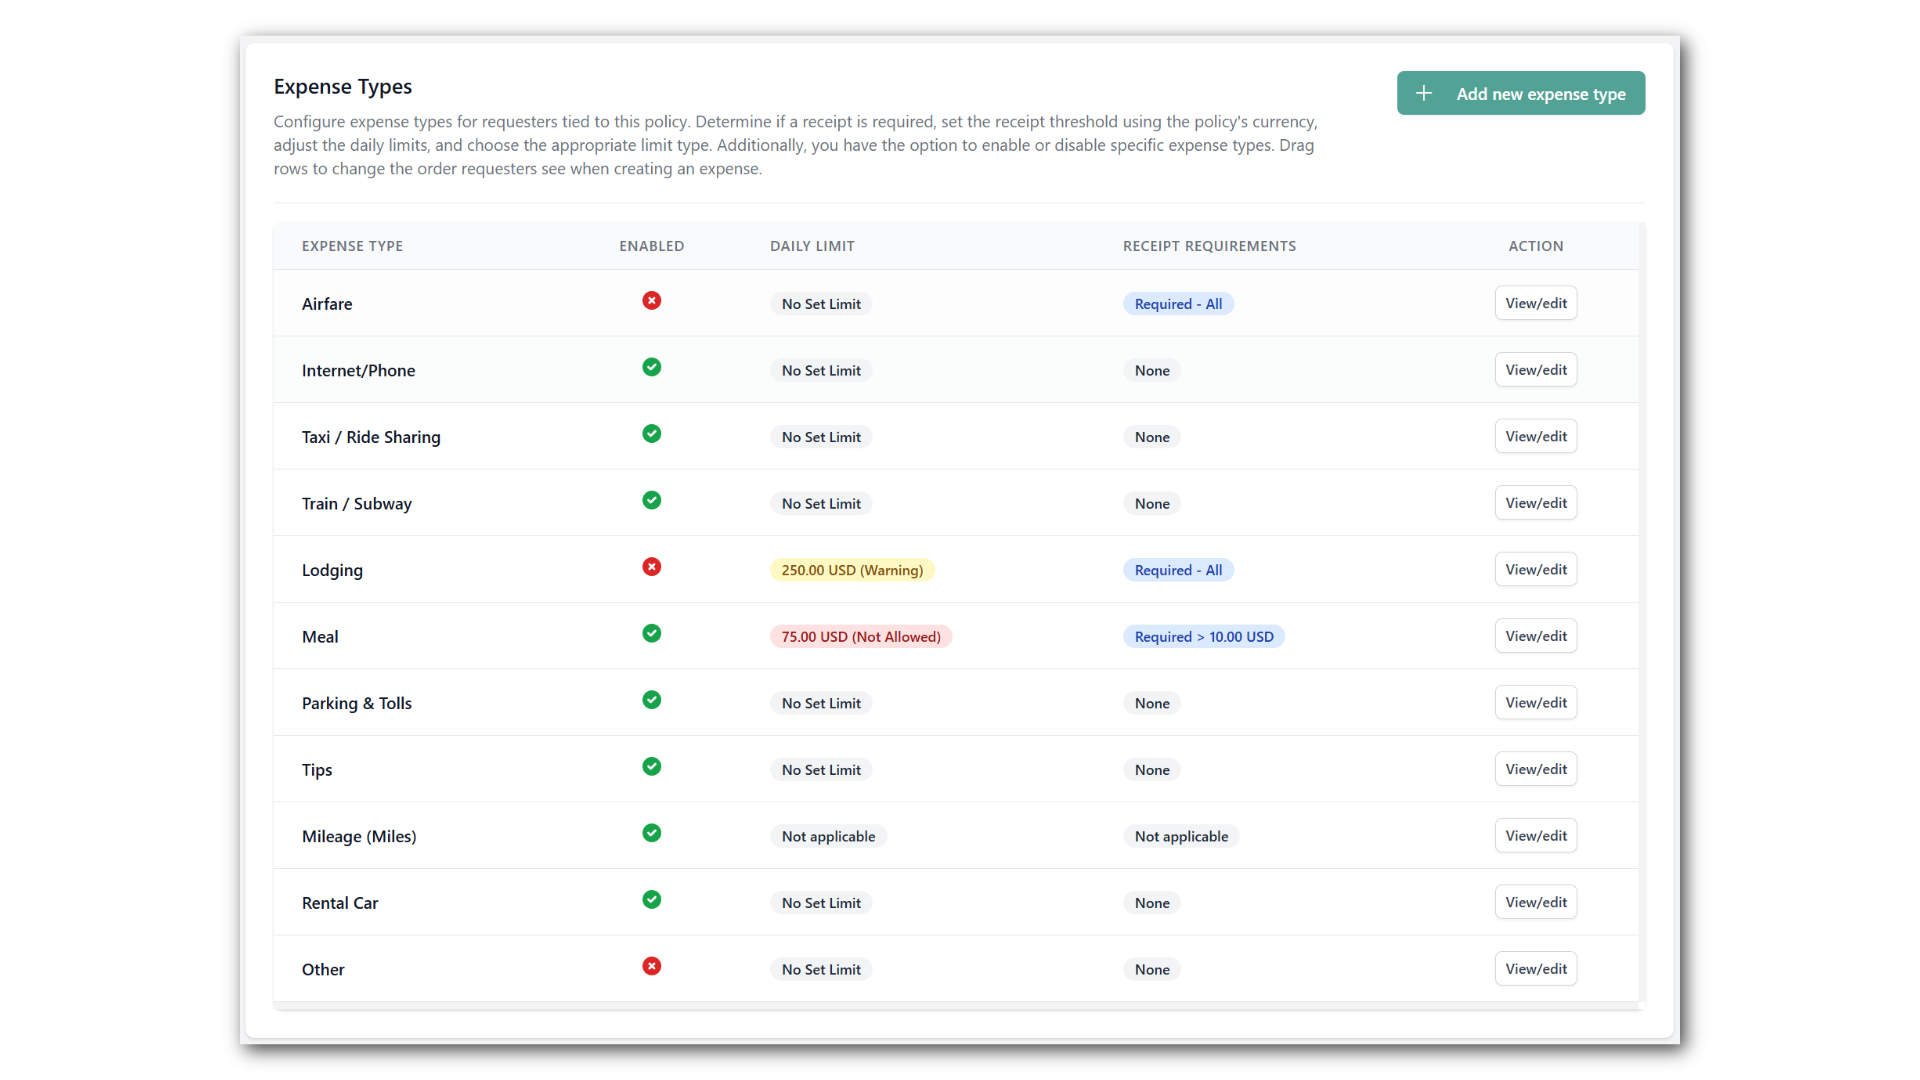
In the Expense Types tab you will be able to create, view, or edit expense types for your policy. These are categories like "Meals", "Lodging", "Airfare", etc.
Enabled: Toggle the Enabled button to turn this expense type on or off.
Daily Limit: Establish a daily limit, if desired, for your expense types. You can determine the limit's value and whether your Requester will be warned of the limit or simply not allowed to exceed it.
Receipt Requirements: Specify if a receipt is required, and if so, the threshold amount.
Advanced option --> Expense code: Optionally, you can include an expense code for your own accounting integration.
Remember to click Update when you're done.
Mileage Settings
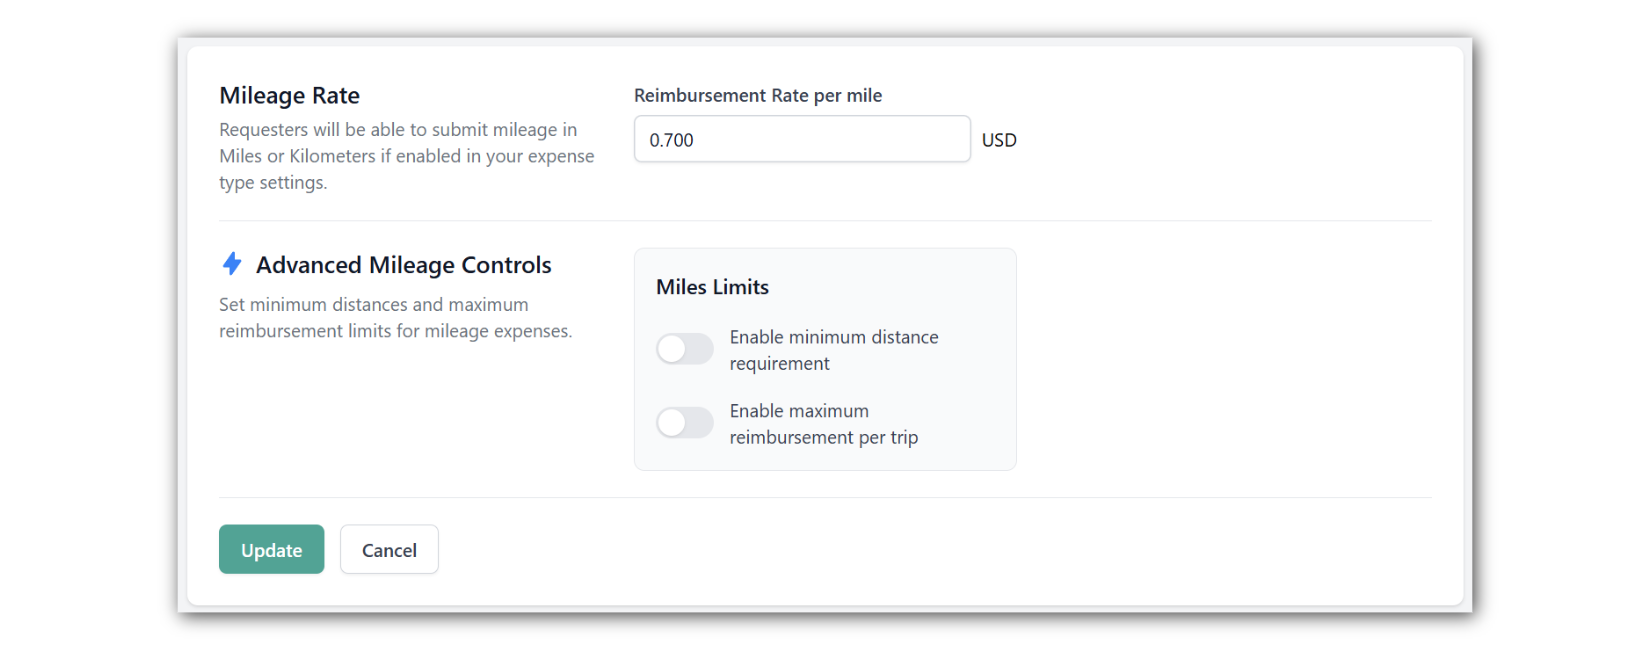
Mileage Rate: Enter the reimbursement rate per mile. Requesters can submit this expense in miles or kilometers if enabled in your expense type settings.
Advanced Mileage Controls: Set minimum distances and maximum reimbursements per trip.
Remember to click Update when you're done.
Prompt Settings
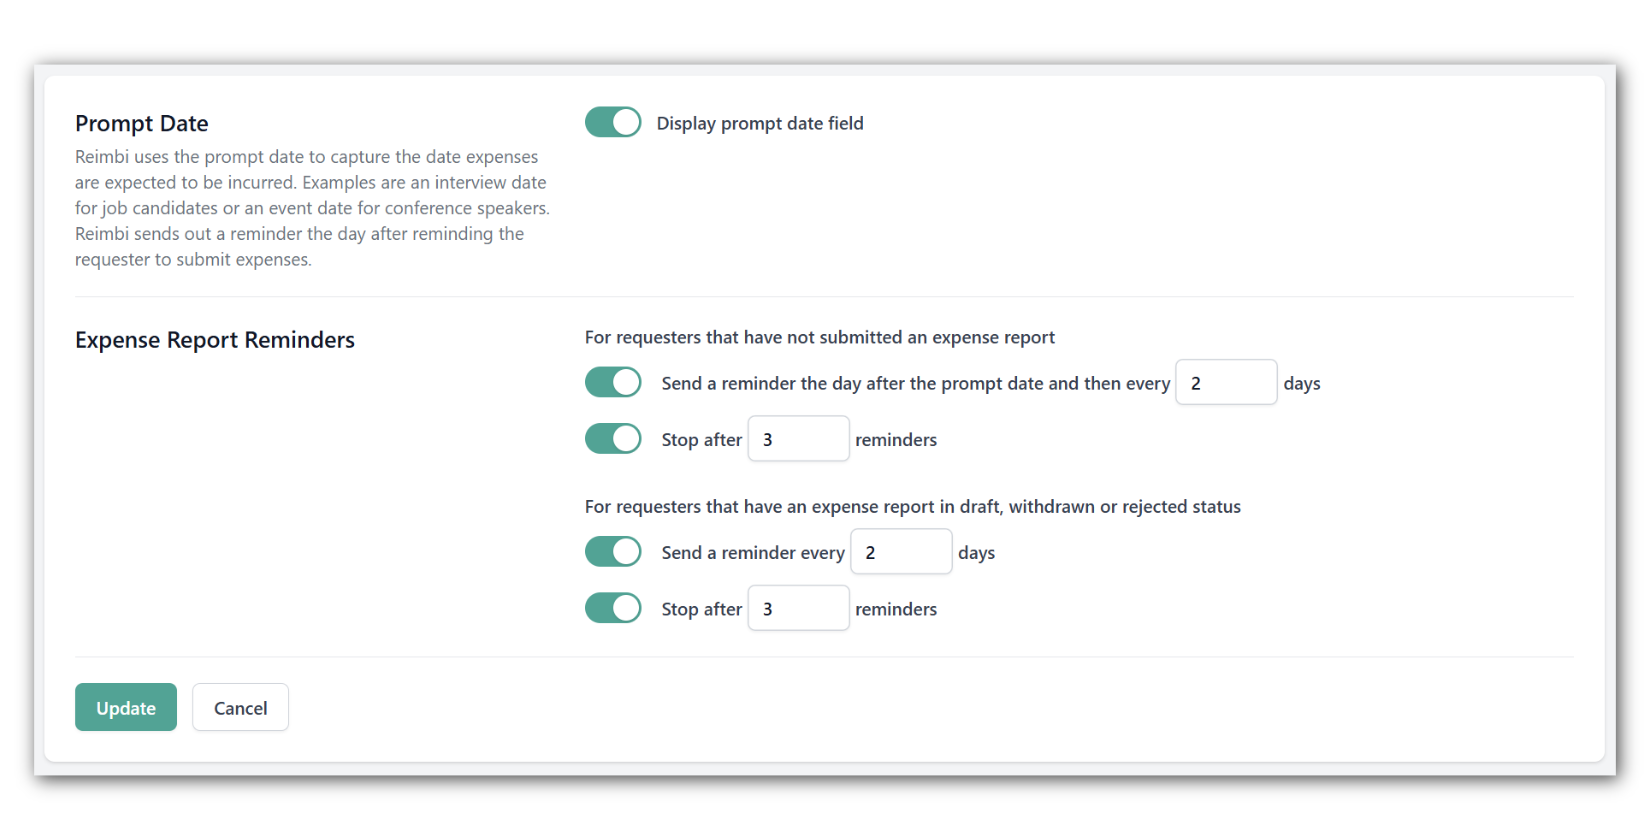
Prompt Date: The prompt date is typically the day of an interview or event date when a Requester is likely to incur reimbursable expenses. Toggle this on to display the prompt date field in Reimbi.
Expense Report Reminders: Set how often you want to remind people to submit their expenses. You can set different rules for people who haven't started a report and those who have a draft.
Remember to click Update when you're done.
Requester Limit Settings
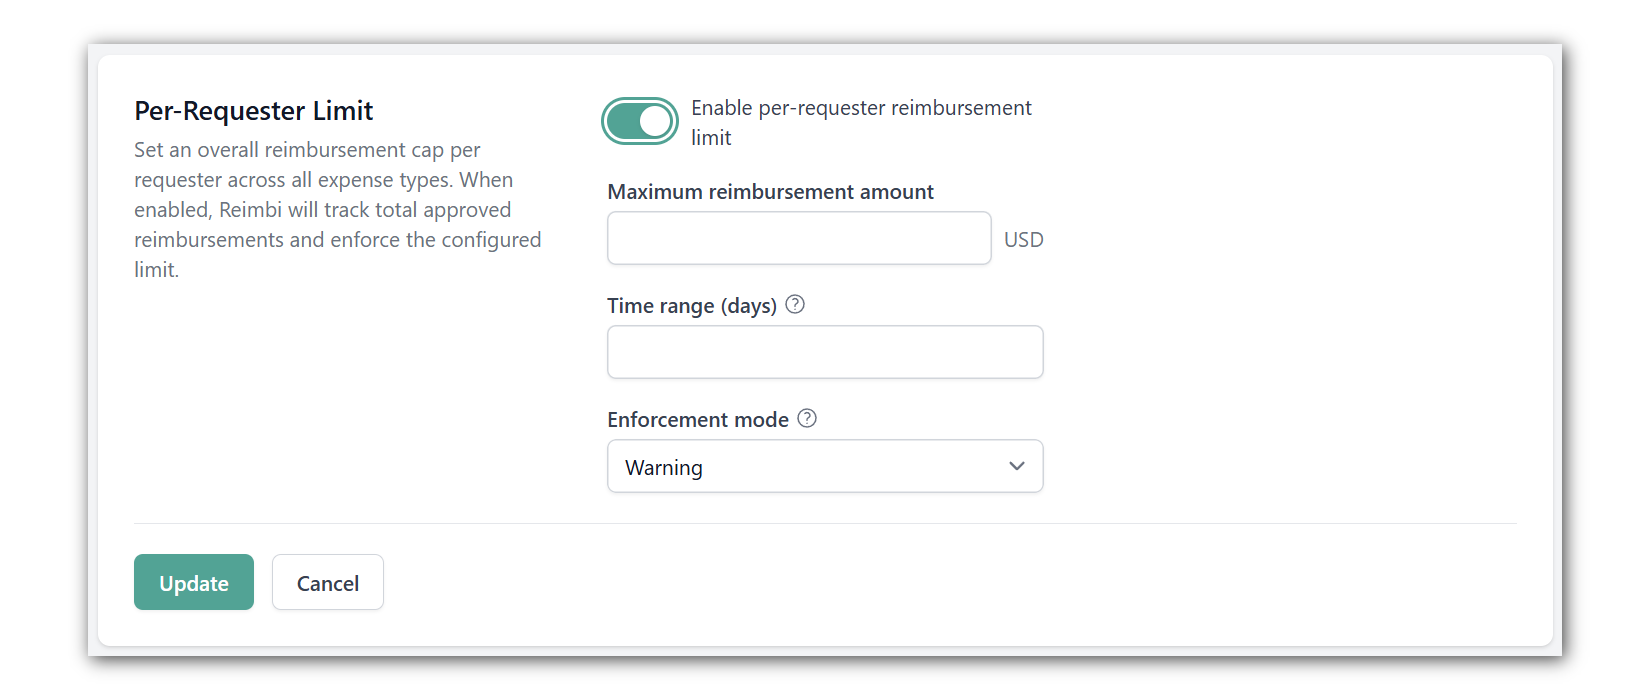
Enable per-requester reimbursement limits when you want to limit the total amount of expenses that a single Requester can be reimbursed for.
Remember to click Update when you're done.
Invitation Email Settings
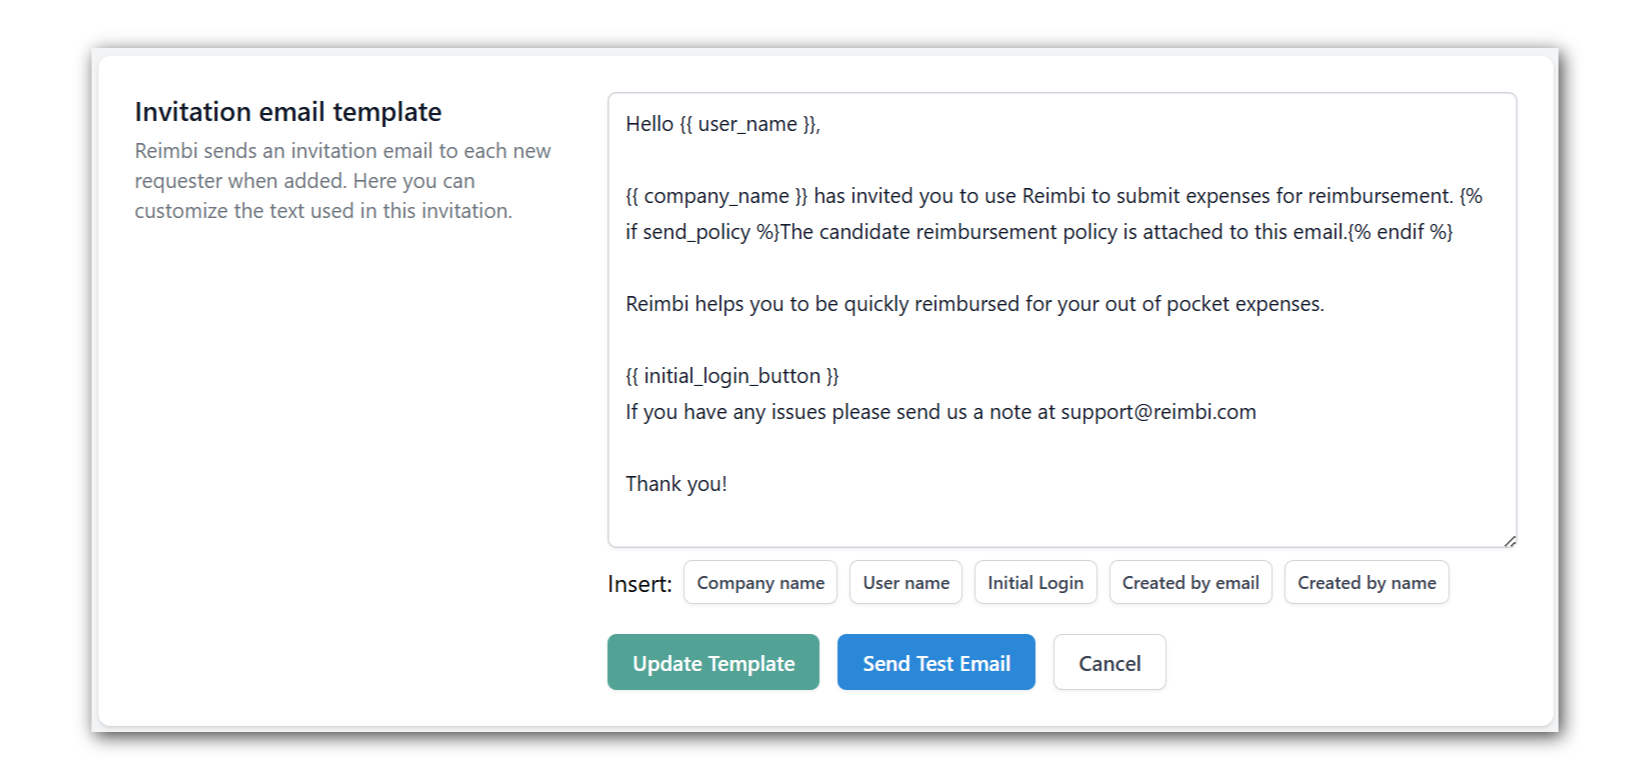
Reimbi sends an invitation email to each new requester when added. Here, you can customize the text used in this invitation.
Invitation email template:
- Variables - Use the Insert options at the bottom of the template to add variables such as User Name or Company name to your message. These appear as {{double brackets}} in your template.
- Conditional content - Use {% if send_policy %}...{% endif %} to include content only if it applies
Remember to click Update when you're done.
Audit History
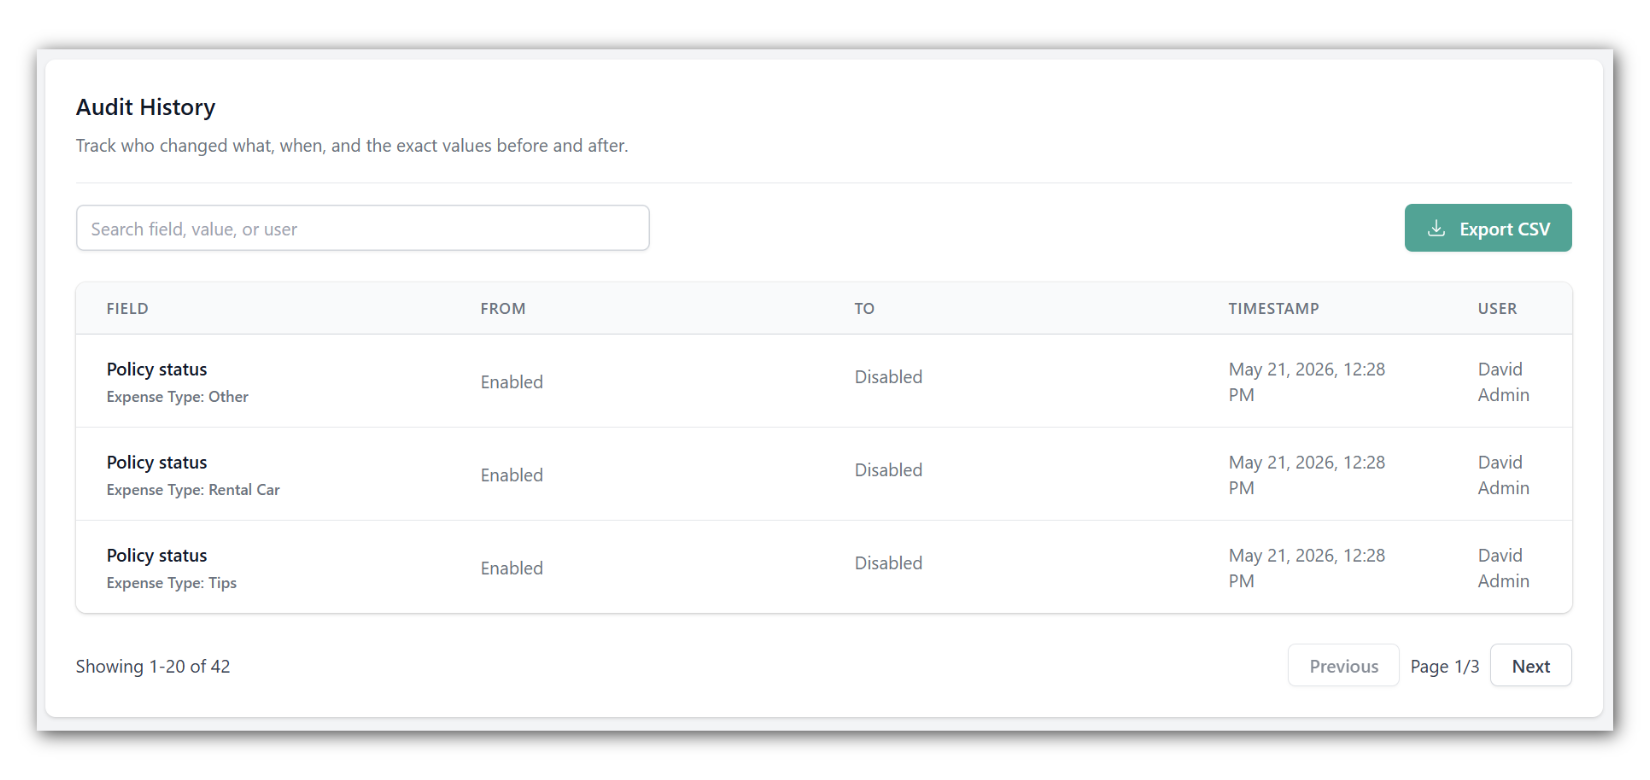
You can track changes made to your expense policy, including the exact time and the Staff User who made the change. You can also export the audit history as a CSV.
Additional Resources
Learn more about related topics in Reimbi's Knowledge Base:
Per Requester limits (Staff User audience)
How am I reimbursed for driving my vehicle? (Requester audience)
How do I manage my notification preferences? (Staff User and Requester audience)
Invitation email (Requester audience)
How do I resend the invitation email? (Staff User audience)
Our goal is to make expense reporting as painless as possible for everyone. If you need any help, don't hesitate to contact the Reimbi support team at support@reimbi.com. Happy configuring!
Was this article helpful?
That’s Great!
Thank you for your feedback
Sorry! We couldn't be helpful
Thank you for your feedback
Feedback sent
We appreciate your effort and will try to fix the article